
Creating a web app with authentication to your backend is one of the key requirements to a lot of web apps. This is pretty easy and straight forward to achieve once you get the hang of it, especially when talking about Azure AD.

Web apps can go both ways: available for the public or available only to authorized users. If you wish to block any unauthorized access to your backend, IMHO, the best way is to go with something that is well established and not to reinvent the wheel.
This is where Azure AD comes in handy. The solutions that Azure AD provides are well tested and supported by one of the largest software companies in the world – Microsoft.
In this article, we are going to:
- Understand the flow
- Create a new app registration in Azure AD
- Protect your Azure Functions app with Azure AD authentication
- Configure your Angular app
If you already have your Azure AD app registration and you just want to dive into it, you can check the GitHub repo with the demo code and some basic instructions on how to make it work.
Understand the Azure AD flow
If you are already familiar with the concept of authenticating your app with Azure AD, you can skip this part.
However, I strongly urge you to understand what’s going on, before you dig in. This will help you fit the solution to your specific needs.
So how does it work?

Basically, Azure AD is going to be your trusted source of user identity verification.
Azure AD is responsible for making sure that the user from your web app is actually the one they claim to be.
The response of this verification is a JWT, which needs to be sent in the authorization header to your backend endpoint.
Your backend will validate the JWT with the same Azure AD source that was accessed from the client, to make sure that the JWT is indeed valid.
If everything works as expected, your call will make it to the backend and potentially, you can get the accessing user information.
There is a lot more to learn and understand. If you really want to dive deep into this, I recommend the authentication on Microsoft docs articles. Easily, one of the most detailed explanations about the topic.
So now, when you got the basic understanding of the flow, let’s start!
Create a new app registration in Azure AD
This is probably the easiest step of all. All we have to do is to create an app registration in Azure AD.
Go the Azure Portal, open Azure AD and select the app registration blade on the left pane:
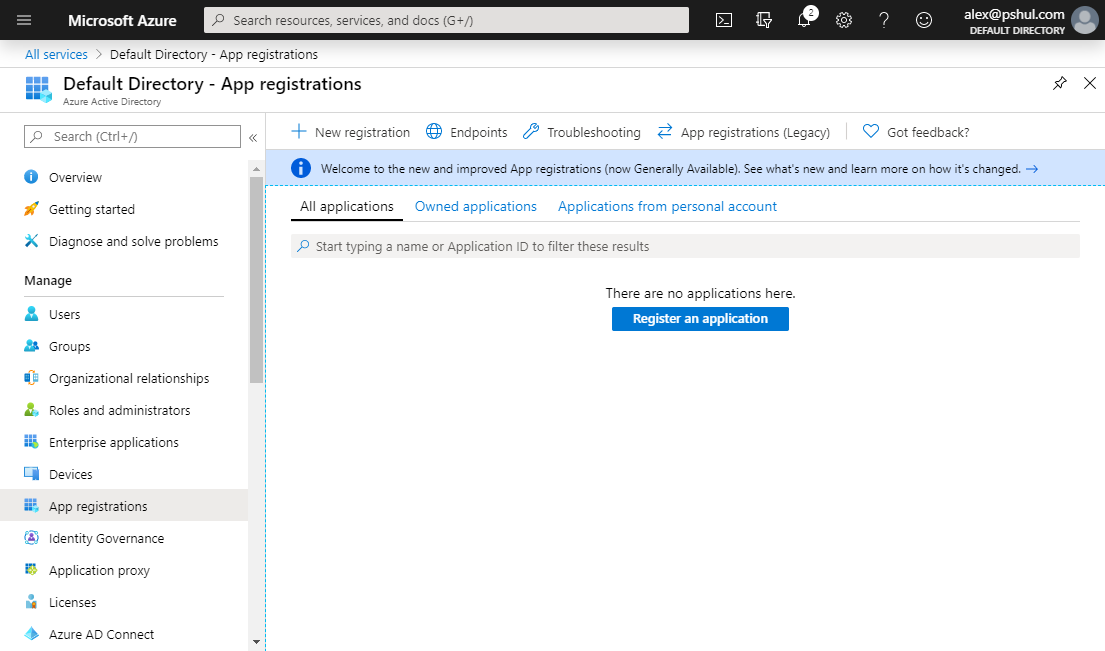
Hit the ![]() button on top to create your new app registration.
button on top to create your new app registration.
You have 3 fields to fill in:
- Give your app a clear readable name. This will help you to identify the app later.
- Select the supported accounts.
- Single Tenant – Only accounts from the current Azure AD instance will be able to sign in.
- Multitenant – Any Azure AD account will be able to sign in.
- Multitenant + Personal – Any Azure AD account will be able to sign in and any personal Microsoft account.
- Redirect URI.
This is the redirect URI you will have to provide in your Angular web app. We will get there in the last part of this article.
For development purposes, you can add the http://localhost:4200 URI.
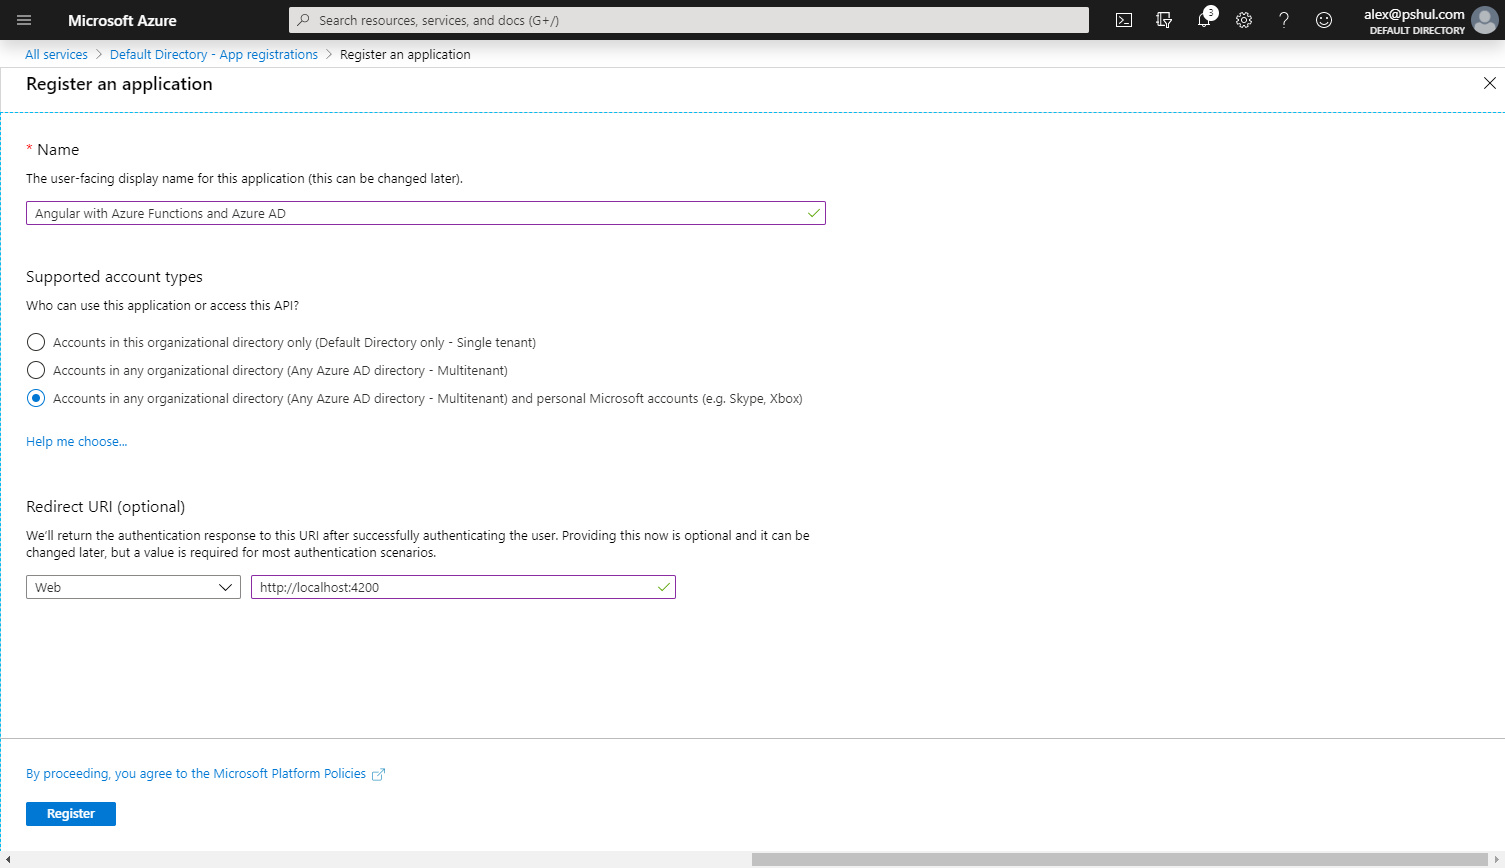
Click the ![]() button on the bottom and wait for the process to finish.
button on the bottom and wait for the process to finish.
After the app registration is set, we need to configure two more things:
- Implicit grant (Read more on Microsoft Docs)
- A new scope
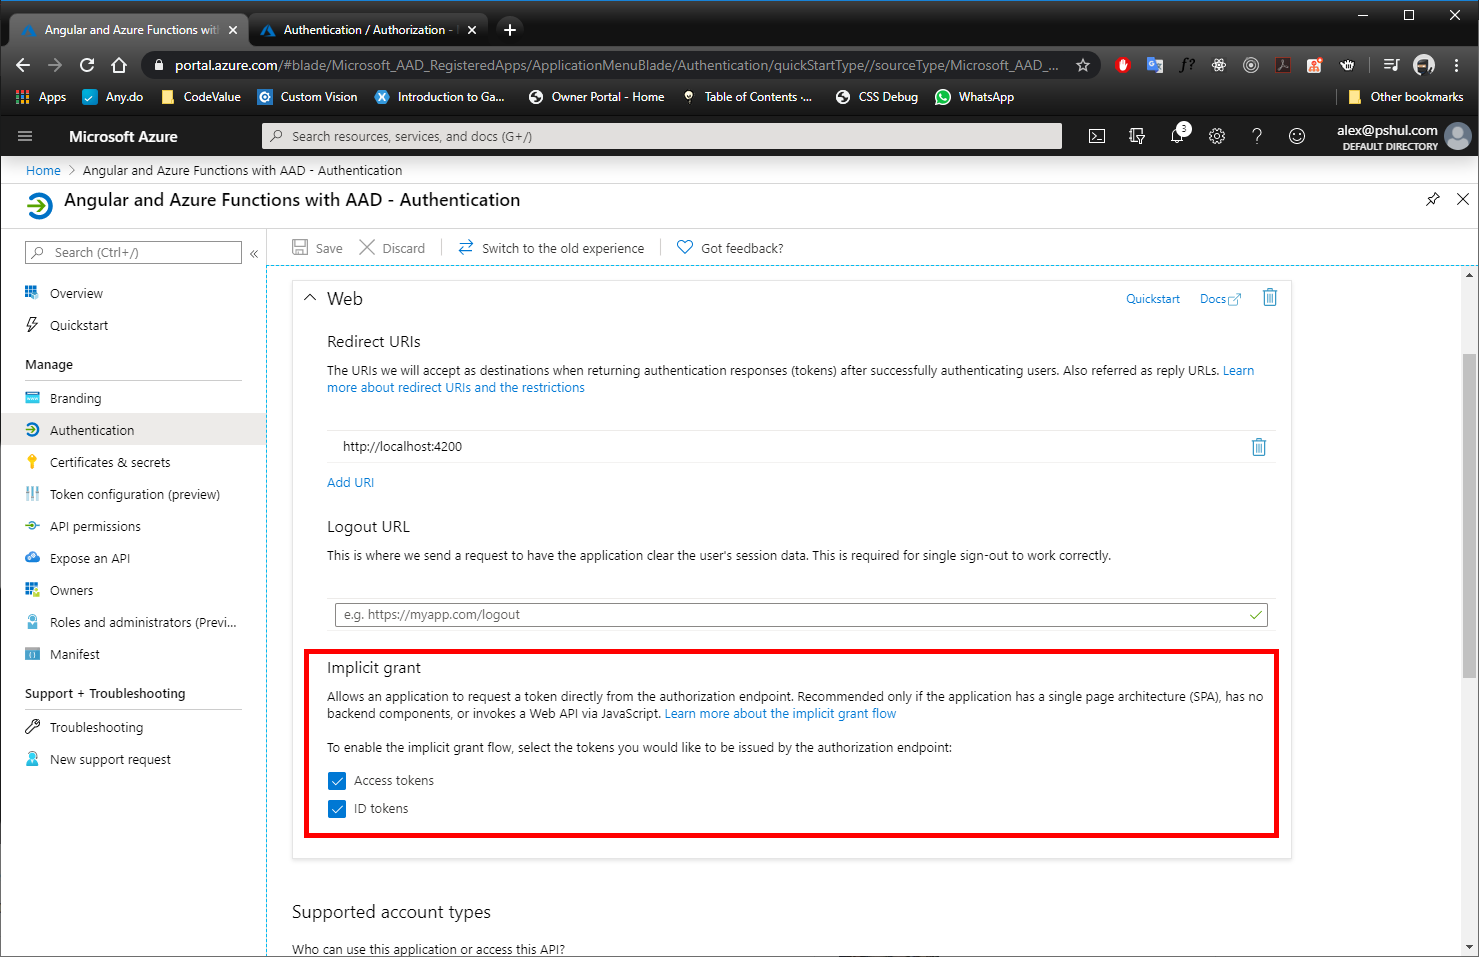
Implicit Grant
Opening your app registration and navigating to the Authentication blade will let you choose which tokens you want to enable for the implicit grant.
Enable both: Access tokens and ID tokens.
A New Scope
The application needs to authenticate to a scope. Navigating to the Expose an API blade will allow you to configure them.
Before creating a new scope, Azure will require you to set up the Application ID URI. The default value would be api://{your app id}.
When creating the scope, set the following:
- Set the scope name.
- Who can consent to use the application? (Any user or only admins?)
- Display names and descriptions for the consent.
Your final result should looks something like this:
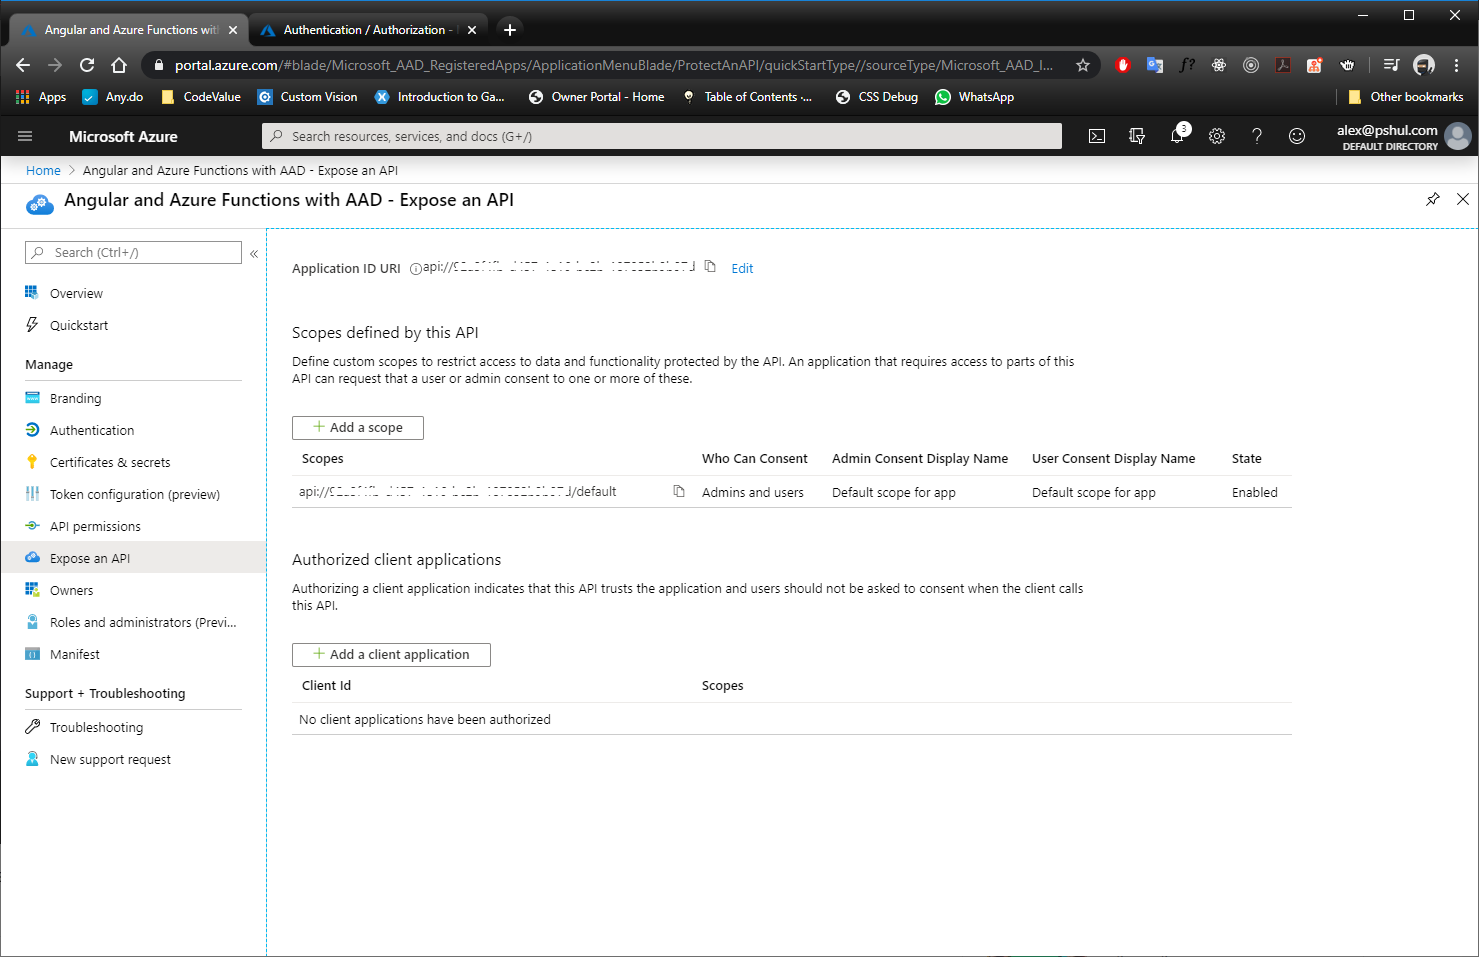
That’s it. Our “gate” is ready. Now we just need to put something behind it.

Protect your Azure Functions app with Azure AD authentication
I’m not going to cover how to create a new Azure Function.
If you are new to Azure Functions, I suggest you check out how to Create your first function using Visual Studio.
The following scenario can be accomplished with any service that supports authentication.
Create and publish your Azure Function
For the purposes of this article, I will be using a very simple function, which returns a geek joke from an external API (shoutout to Sameer Kumar for creating this awesome API).
If you want to use the code for testing, you can copy the function from below or just grab it from my GitHub repo.
[FunctionName("GeekJoke")]
public static async Task<IActionResult> Run([HttpTrigger(AuthorizationLevel.Anonymous, "get", Route = "geek-joke")] HttpRequest req, ILogger log)
{
    using (HttpClient client = new HttpClient())
    {
        HttpResponseMessage response = await client.GetAsync("https://geek-jokes.sameerkumar.website/api");
        string content = await response.Content.ReadAsStringAsync();
        string decodedContent = HttpUtility.HtmlDecode(content);

        return new OkObjectResult(decodedContent);
    }
}
Publish your Functions app to Azure. If you are not sure how to do so, you can read about it in Microsoft Docs: Publish to Azure.
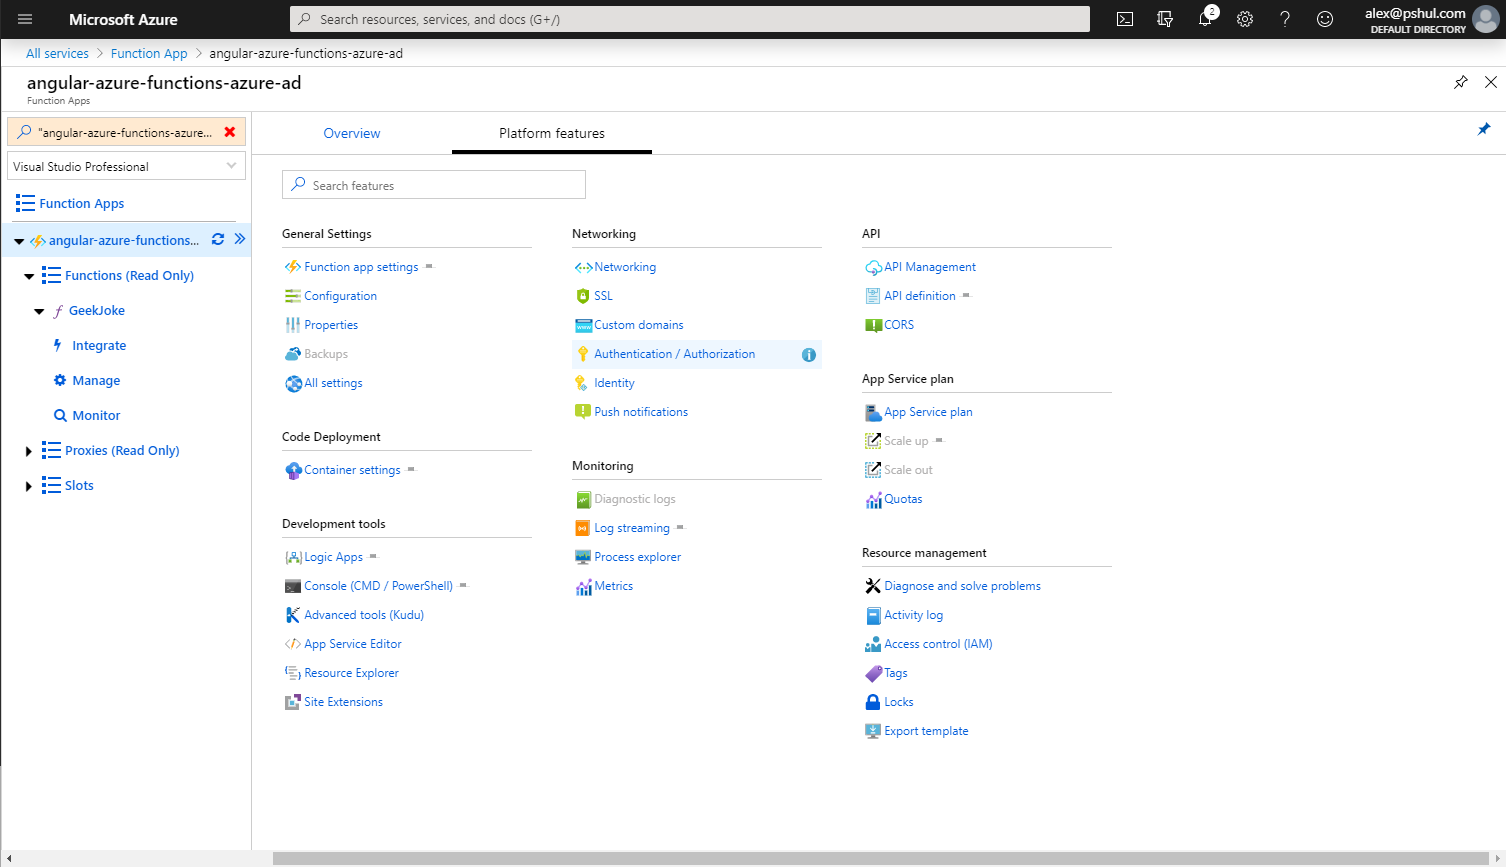
Configure your Authentication with Azure AD
Assuming that your app is now published, log in to Azure Portal, navigate to your published Functions app, click the Platform features tab and select the Authentication / Authorization option.
Turn on the App Service Authentication and change the Action to take when request is not authenticated option to Log in with Azure Active Directory.
Now, Select Azure AD and selected the Advanced Management mode.
You need to provide only two fields here:
- The client ID that was assigned to your app registration.
- Issuer Url:
- For Azure AD users: https://login.microsoftonline.com/{your app registration tenant id}
- For personal Microsoft accounts: https://login.microsoftonline.com/9188040d-6c67-4c5b-b112-36a304b66dad/v2.0
Sadly, as explained HERE, allowing your app to authenticate both type of users is not currently supported.
Click OK and don’t forget to press the save button on the top.
Your final result should looks something like this:
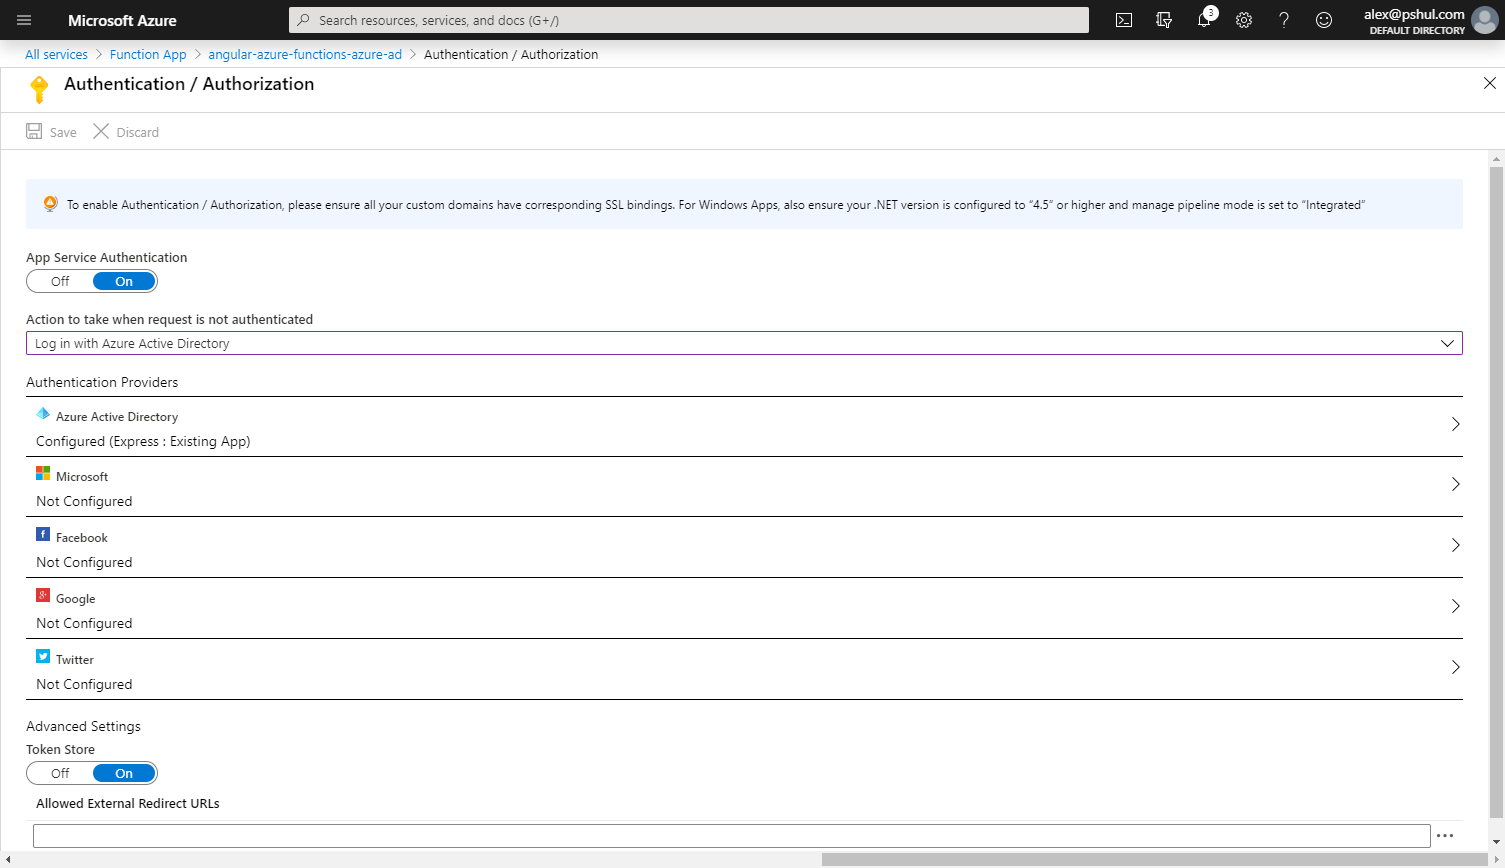
Congratulations! Your Azure Function endpoints are now secured!
If you try to access your endpoint from a browser, you will get a nice login page which requests you to login to your account.

Authenticate Angular app to Azure AD
If you are looking for an Angular 9 setup, check my next post:
Authenticate your Angular 9 to Azure AD using MSAL
The only thing that is left now is to access our endpoint from our Angular web app.
If you need to refresh your memory on how to create a new angular app, check the official setup guide.
You may use your own Angular app, or you can get my sample from my GitHub repo.
It’s just one simple service which calls our endpoint and the default app component, which has a button to invoke the service.
We are going to go over the most simple scenario, in which the web app authenticates right away on load.
But if you need to check other scenarios, the @azure/msal-angular package page is your place to go.
To make our Angular app authenticate to our Azure AD, we will have to do several things:
- Install the package @azure/msal-angular.
- Install the rxjs-compat package.
This is the official work around for now. In the future, this won’t be required. - Configure the MSAL module
- Use MSAL Http interceptor.
- Configure app routing with MsalGuard.
- Configure CORS on the deployed Azure function
Install the packages
Using your favorite package manager, install the two packages:
This is pretty straight forward step which shouldn’t take long to accomplish.
Use MSAL module
First of all, import MsalModule and MsalInterceptor:
import { MsalModule, MsalInterceptor } from '@azure/msal-angular';
Now, let’s add the two objects to our app.
Inside the @NgModule declaration, add the MsalModule to the imports as follows:
@NgModule({
  declarations: [
    AppComponent
  ],
  imports: [
    BrowserModule,
    HttpClientModule,
    MsalModule.forRoot({
      clientID: "{AppRegistrationClientId}",
      redirectUri: "{RedirectUriAfterLogin}",
      authority: "https://login.microsoftonline.com/common",
      consentScopes: "{AppRegistrationScope}",
      protectedResourceMap: [["baseUriToProtect", ["{AppRegistrationScope}"]]],
      cacheLocation: "localStorage or sessionStorage"
    }),
  ],
  providers: [],
  bootstrap: [AppComponent]
})
Let’s go over each of the lines:
- Client ID
This is the ID of the app registration we’ve created in the first step. - Redirect Uri
This is the redirect we’ve previously set to http://localhost:4200.
If you plan to upload your web app somewhere, set the redirect URI to the real one and don’t forget to add it in the app registration redirect URIs list in your app registration. - Authority
This is the authority that will check our login attempt.
You can read more on different types of authority in the Msal Client Application Configuration page on Microsoft Docs. - Consent Scopes
We’ve created a scope when we created our app registration. Use the full URL here. - Protected Resource Map
In this map, we tell Msal which endpoints are protected by which scopes.
Msal will handle this for us, but we need to define the mapping for it.
Insert the base URI of your deployed Azure Function App instead of the “baseUriToProtect” string. - Cache Location
Msal will send the JWT for us. It will store it in the browser storage.
It defaults to session storage, which means it will request to login each time we create a new browser session.
But if you want to save your login information between sessions, you can use the local storage for cache.
Use MSAL Http interceptor
After making sure everything is set up correctly, we will have to provide our Angular app with the Msal Http interceptor, which will intercept our Http calls to add the JWT to the authorization header.
Add the interceptor to the providers array and make sure you import the HttpClientModule and the HTTP_INTERCEPTOR:
import { HttpClientModule, HTTP_INTERCEPTORS } from '@angular/common/http';
import { MsalModule, MsalInterceptor } from '@azure/msal-angular';

...

@NgModule({
  declarations: [
    AppComponent
  ],
  imports: [
    BrowserModule,
    HttpClientModule,
    MsalModule.forRoot({
      clientID: "{AppRegistrationClientId}",
      redirectUri: "{RedirectUriAfterLogin}",
      authority: "https://login.microsoftonline.com/common",
      consentScopes: "{AppRegistrationScope}",
      protectedResourceMap: [["baseUriToProtect", ["{AppRegistrationScope}"]]],
      cacheLocation: "localStorage or sessionStorage"
    }),
  ],
  providers: [
    { provide: HTTP_INTERCEPTORS, useClass: MsalInterceptor, multi: true }
  ],
  bootstrap: [AppComponent]
})
Set MsalGuard in app routing
We will set the simplest option possible, to authenticate on each access to the web app.
If you are familiar with angular guards, this should be pretty straight forward for you:
import { MsalModule, MsalInterceptor, MsalGuard } from '@azure/msal-angular';
import { RouterModule, Routes } from "@angular/router";

...

const routes: Routes = [
  { path: "**", component: AppComponent, canActivate: [MsalGuard] }
];

...

@NgModule({
  declarations: [
    AppComponent
  ],
  imports: [
    BrowserModule,
    HttpClientModule,
    RouterModule.forRoot(routes),
    MsalModule.forRoot({
      clientID: "{AppRegistrationClientId}",
      redirectUri: "{RedirectUriAfterLogin}",
      authority: "https://login.microsoftonline.com/common",
      consentScopes: "{AppRegistrationScope}",
      protectedResourceMap: [["baseUriToProtect", ["{AppRegistrationScope}"]]],
      cacheLocation: "localStorage or sessionStorage"
    }),
  ],
  providers: [
    { provide: HTTP_INTERCEPTORS, useClass: MsalInterceptor, multi: true }
  ],
  bootstrap: [AppComponent]
})
Configure CORS on your Azure Functions
To allow your web app make calls to your Azure function, you will have to set up CORS.
The process is pretty straight forward and well described in this Microsoft Docs page.
We are done!

Everything is set up and ready to be run.
If everything went well, you should be able to press the Fetch Joke button and get a joke:
I hope this article was useful to you and you can now authenticate your Angular web app to your Azure Functions.
Happy Coding,
Alex Pshul.
@The Pshul,
Will this support the latest version of MSAL v2? What I know is that, MSAL v2 is using Authorization Code Flow rather than the Implicit Flow what you have shown here.
Cheers!
Hi Jessie,
Obviously, a different version will require some tweaks, but I see no reason that it won’t work if the code is changed appropriately.
After all, I didn’t invent here anything and didn’t create any library of my own. All the libraries that are used are available and the Azure Functions AAD integration has all the features AFAIK.
Let me know if something specific isn’t working, I’ll do my best to help out.
Alex
Hi PShul,
I followed your steps.
But when I launch my application locally using http://localhost:4200. then it asks me to Login and once Logged In the application keeps on redirecting and asking login to again and again.
Can you plz help?
Hi Kishan,
From my experience, a redirect means you added wrong values somewhere. Double check everything. And I mean EVERYTHING. I once wasted half a day just to realize that I’ve added a slash in the end of an URL. 🤦♂️
I hope you’ll find the issue ASAP. Let me know how it goes. 🙂
Hi @The Pshul,
thank you for posting this great and useful article. I am new to Azure AD authentication and I need to authenticate an angular 9 SPA on Azure using SAML Auth. I’m building an SPA in angular 9 that communicates with a WebApi (core 3.1) that provides data to the application. Both SPA and web api will run in docker on Azure and I need to apply SAML authentication to this scenario (unfortunately I cannot change Auth mode as this is the client request).
I’m struggling to understand the difference between SAML auth and other types of auth (i.e. OpenId) and I’m afraid of picking a tutorial that is not the correct one.
Is this tutorial specific for SAML implementation?
Sorry for the silly question but I’m quite confused on the matter.
thank you! 🙂
Paolo
Hi Paolo,
Sorry, but I think that I can’t be much of a help here. I’m not familiar too much with SAML applications.
I suggest you start from these two places:
1. Here is how to configure your enterprise application with SAML:
https://learning.postman.com/docs/administration/sso/saml-in-azure-ad/
2. Here is the protocol specification in the Microsoft Docs:
https://docs.microsoft.com/en-us/azure/active-directory/develop/single-sign-on-saml-protocol
I hope it would give you a head start. Sorry I can’t help you more than that. 🙁
Hi,
I am getting unauthorized 401 error on hitting the Function App.
Hi Nagadhiraj,
Can you please share more details about your problem?
Did you register your app with access to any user or only for a user from the current directory?
Which user you are using to log in?
Without some additional information, I won’t be able to help you out.
I have tried to follow your instructions and get this sample app running but no success:
We’re unable to complete your request
unauthorized_client: The client does not exist or is not enabled for consumers. If you are the application developer, configure a new application through the App Registrations in the Azure Portal at https://go.microsoft.com/fwlink/?linkid=2083908.
Here are the steps I’ve taken. Can you please help me work out where I’ve gone wrong. Thanks.
Azure AD Authentication from Angular to Azure Functions
https://www.pshul.com/2020/02/07/azure-ad-authentication-from-angular-to-azure-functions/
1. Create a new App Registration in Azure AD.
Open Azure AD.
Select the App registration blade on the left hand navigation.
Click the ‘+ New registration’ button.
Name:
pshulSPA
Supported account types:
Accounts in this organizational directory only (Default Directory only – Single tenant)
Redirect URI:
http://localhost:4200
Click the ‘Register’ button.
Summary details:
Display name:
pshulSPA
Application (client) ID:
465a53b9-72f2-4d5f-9b6f-f9c5c422268e
Directory (tenant) ID:
c61250f4-60c7-4714-8f7b-5ea65acff6a1
Object ID:
38b5b699-ff8c-4ab0-b138-99f85e8620a2
2. App Registration – Implicit Grant
For the pshulSPA App registration, click on the Authentication blade.
In the ‘Implicit Grant’ section, select both: Access tokens and ID tokens.
Click ‘Save’.
3. App Registration – Scope
For the pshulSPA App registration, click on the Expose an API blade.
Set the Application ID URI:
api://465a53b9-72f2-4d5f-9b6f-f9c5c422268e
Click ‘+ Add a scope’:
Scope name:
pshul
api://465a53b9-72f2-4d5f-9b6f-f9c5c422268e/pshul
Who can consent?
Admins and users
Default scope for Admin User
Default scope for Admin User of App
Default scope for User
Default scope for User of App
State: enabled
Click ‘Add scope’.
4. Create and publish your Azure Function app (from Visual Studio 2019)
(a) Publish your Function app to Azure:
https://docs.microsoft.com/en-us/azure/azure-functions/functions-develop-vs#publish-to-azure
Use the following steps to publish your project to a function app in Azure.
(i) In Solution Explorer, right-click the project and select Publish.
(ii) In Pick a publish target:
– Azure Functions Consumption Plan.
– Create New.
– Run from package file (recommended).
(iii) Select Create Profile. If you haven’t already signed-in to your Azure account from Visual Studio, select Sign-in.
(iv) Enter:
Name: GeekJokeFetcher-AppService
Subscription
Resource group: GeekJokeFetcher-ResourceGroup
Location
Azure Storage: geekjokefetcherstorage
Click Create.
(v) Select Publish and after the deployment completes, make a note of the Site URL value, which is the address of your function app in Azure.
Site URL: https://geekjokefetcher-appservice.azurewebsites.net
(b) Configure your (published) Azure Function app Authentication with Azure AD
Navigate to your published Function app and select the Authentication / Authorization option.
GeekJokeFetcher-AppService | Authentication / Authorization
Turn on the App Service Authentication.
Change the Action to take when request is not authenticated option to ‘Log in with Azure Active Directory’.
Select Azure AD and selected the Advanced Management mode.
Client ID (that was assigned to the App registration):
465a53b9-72f2-4d5f-9b6f-f9c5c422268e
Issuer Url:
For Azure AD users: https://login.microsoftonline.com/{your app registration tenant id}
https://login.microsoftonline.com/c61250f4-60c7-4714-8f7b-5ea65acff6a1
Click OK.
Click Save.
5. Configure the Angular 9 app to Authenticate to Azure AD using MSAL.
environment.ts:
export const environment = {
production: false,
jokeUrl: ‘https://geekjokefetcher-appservice.azurewebsites.net/api/geek-joke’,
aadClientId: ‘465a53b9-72f2-4d5f-9b6f-f9c5c422268e’,
redirectUrl: ‘http://localhost:4200/’,
aadUserReadScope: ‘api://465a53b9-72f2-4d5f-9b6f-f9c5c422268e/pshul’,
apiBaseUrl: ‘https://geekjokefetcher-appservice.azurewebsites.net/’,
};
6. Configure CORS on your Azure Functions
Go to: GeekJokeFetcherAPI (app service).
Under API (in left nav) select the CORS blade.
Select: Enable Access-Control-Allow-Credentials
Allowed Origins:
Remove all others.
Add: http://localhost:4200
Click Save.
Wow, thanks for explaining in detail the steps you’ve taken. This is very helpful for me to understand what is wrong.
At first glance, it looks like you have done everything correctly. I’m not even sure what’s the problem.
You can see that the error you are getting is due to a bad configuration or a typo: https://docs.microsoft.com/en-us/azure/active-directory/develop/reference-aadsts-error-codes#handling-error-codes-in-your-application
(Find the error you are getting)
Could you please do the following and let me know?
Please make sure that the user you are logging in to the WebApp is actually the user on the tenant that the app was registered on. Since the app is registered only for the same tenant users, users from outside the tenant might get this error, since the app is not actually visible for them.
Thanks for the suggestion.
That account was associated with the tenant as a Microsoft Account. Still I couldn’t login.
According to StackOverflow: “To allow a Microsoft Account, you must choose Accounts in any organizational directory (Any Azure AD directory – Multitenant) and personal Microsoft accounts (e.g. Skype, Xbox) when you register the application”.
I made that change. Still I couldn’t login.
I created another account (an Azure Active Directory account).
I can login now.
However, when I click the ‘Fetch Joke’ button, I get the error:
“status”:401,”statusText”:”Unauthorized”,”url”:”https://geekjokefetcher-appservice.azurewebsites.net/api/geek-joke”,”error”:”You do not have permission to view this directory or page.”
OK, so this is progress! Which is good! 🙂
The reason you couldn’t log in after you changed the app registration to work with any account is because the issuer ID also needs to be changed. You’ll have to add the /v2.0 in the end of your URL.
After creating a user from the same active directory, you were able to log in, which means the Angular App is well configured and we can move on to the next step of troubleshooting.
The next thing we need to test is to make sure that the token is actually sent to the backend.
On your web app, open the developer tools and check the network tab. You should see all the requests there. If not, refresh the page.
Find the request to your API and see which headers you are sending. Are you sending the token under the authorization header?
If not, it looks like the secure endpoints in your Angular configuration is not matching the URL you are trying to access.
Let me know how it goes,
Alex.
Can you help me please?
I have defined the following redirect url in the angular app:
redirectUrl: ‘https://angularazurefunctionsad.azurewebsites.net/’,
and also in Azure AD.
However, I get the error:
Sorry, but we’re having trouble with signing you in.
AADSTS50011: The reply URL specified in the request does not match the reply URLs configured for the application: ‘9119fd36-74e9-4f64-9b4c-2bd6cd348308’.
Apparently, the request is sending:
redirect_uri=https://geekjokefetcherapi.azurewebsites.net/.auth/login/aad/callback
Can you help me fix this please?
Hmm… That’s odd.
Just to make sure, did you set the authentication for the deployed Azure Function?
Also, it would be helpful if you could post the full angular configuration.
I’ve gone through the configuration again.
In the text of your article you say “Select Azure AD and selected the Advanced Management mode.”
However, the screenshot shows: Authentication Providers –> Azure Active Directory –> Configured (Express: Existing App)
Which is correct?
Anyway, I’ve tried both and I get the same error:
When I go to:
https://geekjokefetcherapi.azurewebsites.net
I get:
Microsoft
Sign in
Sorry, but we’re having trouble with signing you in.
AADSTS50011: The reply URL specified in the request does not match the reply URLs configured for the application: ‘9119fd36-74e9-4f64-9b4c-2bd6cd348308’.
My configuration in envornment.ts of Angular 9 app is:
jokeUrl: ‘https://geekjokefetcherapi.azurewebsites.net/api/geek-joke’,
aadClientId: ‘9119fd36-74e9-4f64-9b4c-2bd6cd348308’,
redirectUrl: ‘https://angularazurefunctionsad.azurewebsites.net/’,
aadUserReadScope: ‘api://9119fd36-74e9-4f64-9b4c-2bd6cd348308/default’,
apiBaseUrl: ‘https://geekjokefetcherapi.azurewebsites.net/’,
Confused?
Just to confirm, your app.module.ts doesn’t have the .forRoot() as this is for Angular 9?
I’m using your code for Angular 9 and there is no: MsalModule.forRoot
This is correct? Yes / No?
Sorry for taking long.
Yes, there is no .forRoot() in the Angular 9 repo.
Oops, you are right! I’ve screwed up the screen shot. My bad.
Anyway, for this simple scenario, it shouldn’t really matter. I prefer the manual setup since it gives you a bit more control for more advanced scenarios (As function-to-function protected calls).
I would like to join Elvin (He is already a veteran in that subject ^^), since this is Angular 9 we are talking about, you should not call the .forRoot() on the module.
Also, I know it might sound *really* stupid,
But, please make sure that the redirect url that you configure in your Azure AD registered application has the trailing slash. I already had similar issues in different projects, so it might even be that small annoying slash.
Let me know how it goes.
A quick question.
In the article above you mention when configuring the Azure Function in section ‘Configure your Authentication with Azure AD’: “You need to provide only two fields here: 1. The client ID that was assigned to your app registration.”
I guess that this is the Client ID from the previously configured App Registration for the Angular client app? Or am I missing an App Registration for the Azure Function app?
Hi Walter,
No, you are not missing another registration. In this scenario, only 1 app registration should be enough.
However, I thought about something. Are you trying to run your web app locally or from a deployed environment? How did you deploy?
If you are running locally, you need to add your localhost (including the port) as a reply URL to the app registration and to the Angular configuration.
If not, can you confirm that there are no trailing slashes in the registered app return URLs?
Let me know how it goes.
Oh, and another thing.
After you protect your Azure Functions app with AAD, you won’t be able to call the endpoint directly (via your browser) without re-configuring the registered app with the Azure Functions well known endpoints.
However, this should not have any effect on the above scenario.
Hi Alex
I can’t seem to reply to your last message…
Anyway, just to confirm, your AuthorizationLevel is your function is anonymous? Why not user?
Thanks!
Hi Elvin,
As far as I know (And I might be wrong on that one), there are two reasons.
First of all, the User level is for EasyAuth, which won’t apply for some of the scenarios that I needed when I worked on it. (Only specific directory login).
Second, any level other than Anonymous is not for production deployment. See official docs:
https://docs.microsoft.com/en-us/azure/azure-functions/functions-bindings-http-webhook-trigger?tabs=csharp#secure-an-http-endpoint-in-production
Oh, that’s a bit misleading to use anonymous in production if you are shown other options.
Anyway, thanks again!
I completely agree with you. That is indeed very misleading.
Thanks for the great conversation. I hope that everything works for you now. 🙂
Thanks for the post.
Any ideas how to grab the token in Azure Functions passed from Angular?
Hi Elvin,
You can get the token by accessing the request headers.
It should be under the Authorization header, in the format: “Bearer YOUR_TOKEN”.
Thanks, Alex. However, my Auth Header is empty.
I’ve used:
this.broadcastService.subscribe(“msal:acquireTokenSuccess”, ()=> {
console.log(‘Got token’);
});
to confirm that I really do get a token and it did log.
In your screenshot in “Expose an API” your scope starts with api:// but mine is https://[tenantname].onmicrosoft.com/%5BappId%5D/
Any ideas why we’re different?
It looks like you didn’t set up the protectedResourceMap in your MSAL configuration or you didn’t use the MsalInterceptor. These are required to send the token in the headers.
Even if you successfully log in and get the token, without setting up the above, the token won’t be sent to the endpoints.
Regarding the scope,
The scope is based on the Application ID Uri that you can see in the top of the screenshot. If your ID Uri is different, then your scope would be different. But that’s just a string, so it shouldn’t really affect anything.
Okay, now I know why my screen is different from yours–I’m using Azure AD B2C.
From your screenshot you’re using your Default Directory but in B2C you need to create a new directory. That’s why your scope begins with api:// and mine is with the http://[tenantName].onmicrosoft.com.
Do you know if the settings are different or do you have an example for Angular-Azure Functions for Azure AD B2C?
Thanks
TBH, I didn’t try the B2C flow yet.
From a quick search, I found that it does require some additional configuraitons.
Check the tutorial in the official docs:
https://docs.microsoft.com/en-us/azure/active-directory-b2c/tutorial-create-tenant
And check this article, it looks very promising:
https://medium.com/@ravindraa/secure-azure-functions-using-azure-ad-b2c-986e4ad07c6c
Although, note, that I didn’t try any of those.
I would very much appreciate it if you could update here once you got it working. I’m really interested in the outcome. 🙂
Argh… my comment went down there and I can’t delete it.
Anyway, reposting here…
==========================
I can actually make it work but there’s no token when it the Azure Functions get called. I took a look at the sample provided by Microsoft on
https://github.com/Azure-Samples/active-directory-b2c-javascript-angular-spa
but their sample doesn’t give me the token as well.
Can you give this a shot?
Hmm… Can you check that the token is actually sent? Not that you receive it, but that you actually send it in the headers?
Go to the developer tools in your browser and hit the network tab.
Make the call and check the headers. If it’s not there, something might be wrong in your client side configuration.
Also, I read somewhere (can’t remember right now where it was) that the header might be passed with a different. Check all the headers that you send in your request.
I also tried your GitHub solutions using Angular 8 and I also don’t get the token in the browser. The only thing I changed is the jokeUrl so it points to VS (http://localhost:7071/api/geek-joke).
Can you please confirm you get the token from Angular?
Okay. I finally got it.
I removed the .forRoot() as described here:
https://github.com/garaio/DevCamp-AzureServerless/blob/master/Solutions/D04-AAD-B2C-multi-tenancy/Source/Garaio.DevCampServerless.ClientApp/src/app/app.module.ts
Tutorial is found here:
https://github.com/garaio/DevCamp-AzureServerless/blob/master/Solutions/D04-AAD-B2C-multi-tenancy/Readme.md
Hi Elvin,
I’m glad you found a way to make it finally work and I really appreciate that you took the time to come back and update. 🙂
I faced the .forRoot() problem when switched to Angular 9 and Ivy. It’s odd that it is configured on the GitHub repo, though.
Anyway, let me know how is it going with your main project. 🙂
@The Pshul, I am getting stuck on the CORS. I am unable to get my Angular app connect. I followed all the steps and went through the documentation as well and I believe everything is correct. Any ideas what I am doing wrong?
Hi Mani,
Please share some of your code. Without anything concrete, I won’t be able to actually investigate the problem.
@The Pshul, I am getting stuck on the CORS. I am unable to get my Angular app connect. Any ideas what I am doing wrong?
Thanks for posting, Alex, will read soon 🙂
Hope you’ll find it helpful. 🙂